It’s Christmas time again. A few years ago I bought some time switches to automatically turn on and off the Christmas lighting at specific times. They were quite cheap, but they work well and are actually very flexible. The only downside is that they’re quite unintuitive to operate. I always forget how to program them and I also lost the user manual. I searched online, but I cannot find any instructions or manuals. So here I am, figuring out how it works by brute force. Again. But this time I note it down. This post is mostly for my future self. And people who are in the same situation. But come on. How likely is it? Anyway, here you go:
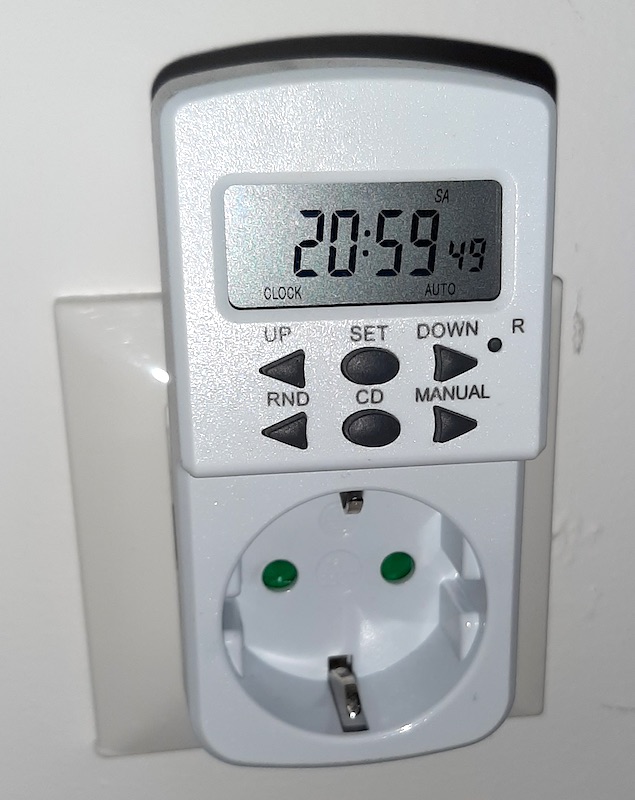
This is the hardware:
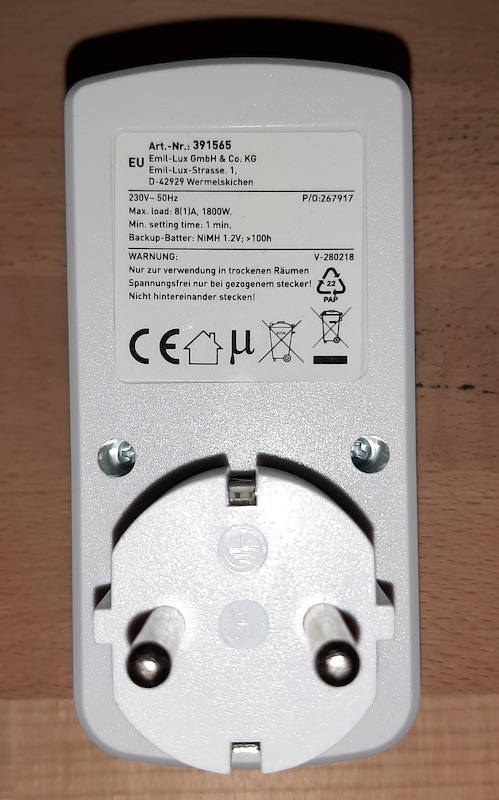
Art.-Nr.: 391565
Emil-Lux GmbH & Co. KG
Emil-Lux Strasse 1,
D-42929 Wermelskirchen
----------------------------------------
230V - 50Hz                   P/O:267917
Max. load: 8(1A)A, 1800W.
Min. setting time: 1min.
Backup-Batter: NiMH 1.2V; >100h
----------------------------------------
WARNUNG:                        V-280218
Nur zur verwendung in trockenen Räumen
Spannungsfrei nur bei gezogenem Stecker!
Nicht hintereinander stecken!
Program
Reset
If the screen is off and it wasn’t plugged in for a long time, plug it in for a while to let the built-in battery charge. If the screen is still off, reset it by sticking a biro or needle on the small R button. This deletes all programs and resets the clock.
Set the time
- Long press SET until
SETin the left bottom corner starts blinking. - Choose the day using UP and DOWN buttons (yes, it’s very weird, the left button moves the selection to the right and the right button moves the selection to the left). Confirm with SET.
- Choose hour using UP and DOWN, confirm with SET.
- Choose minute using UP and DOWN, confirm with SET.
- Done.
Switch between AM/PM and 24h format
Press SET + CB together.
Turn the switch on and off manually
- Turn on: Press MANUAL until you see
ONin the right bottom corner. - Turn off: Press MANUAL until you see
OFFin the right bottom corner. - Use programmed times: Press MANUAL until you see
AUTOin the right bottom corner.
Program ON and OFF times
The starting point is the clock.
- Press UP to select the program (press DOWN to go back to the previous program). There are 10 on and off programs. on and off are basically two separate programs. You could for example define an off time, but no corresponding on time. So choose the program where you want to set a time and make sure to pay attention to the little on or off next to the program number.
- To set the time for the selected program, press SET.
- Choose the days using UP and DOWN, there are all kinds of combinations as well, e.g. every second day or weekends only, etc. Confirm with SET.
- Choose hour using UP and DOWN, confirm with SET.
- Choose minute using UP and DOWN, confirm with SET.
- Done. You can choose another program now using UP and DOWN or go back to the clock.
Other functions
The time switch has other functions that I couldn’t figure out yet. RND seems to enable a “random” mode. But I couldn’t figure out any details. There is also the CB thing. No idea what it is.
I hope this was helpful. I personally definitely have to come back to this page in about 1 year. Greetings to my future self!
Update 2021-01-04
Thanks to @digsyswave for sending me a link to a manual for a very similar device that likely uses the same chip (link to manual, mirror):
Random function
Press RND to enable or disable “random function”. The R on the display indicates the “random function” is enabled.
It will randomly turn the switch on and off again for 10-31 minutes between 18:00 and 6:00.
Countdown
The starting point is the clock.
-
Press DOWN to select the “CD” program. You should see
CDat the bottom of the display. -
Press SET to configure the countdown.
-
Use UP or DOWN to select if you want to turn the switch on or off while the countdown is running. Depending on what you select the switch will behave differently (the naming might be a bit unintuitive):
ON: The switch is on during the countdown is active and will turn off when the countdown finishes.OFF: The switch is off during the countdown is active and will turn on when the countdown finishes.Press SET to confirm.
-
Choose the countdown hours using UP and DOWN, confirm with SET.
-
Choose the countdown minutes using UP and DOWN, confirm with SET.
-
Choose the countdown seconds using UP and DOWN, confirm with SET.
-
The countdown is saved now, but not started. Press CD to start the countdown. The countdown can be started from the clock (you’ll see
CDblinking on the bottom of the display while the countdown is active) or directly from the “CD” program, where you also see the remaining time of the countdown. -
You can press CD to cancel the countdown, or if the countdown is already finished CD starts it again with the saved configuration.